Friday, September 30, 2011

Center a Blog Header in Blogger


Hi Everyone~

Often, people need to move their blog headers to center them.  Those that are off-center show that a blogger is "lost" on the virtual highway...I know because I was lost once!  So, here's how you can center a blog header.  It's not hard.  I would suggest that you write down the steps.  That will make it easier.

First, I will go to my blog. I will go to the top
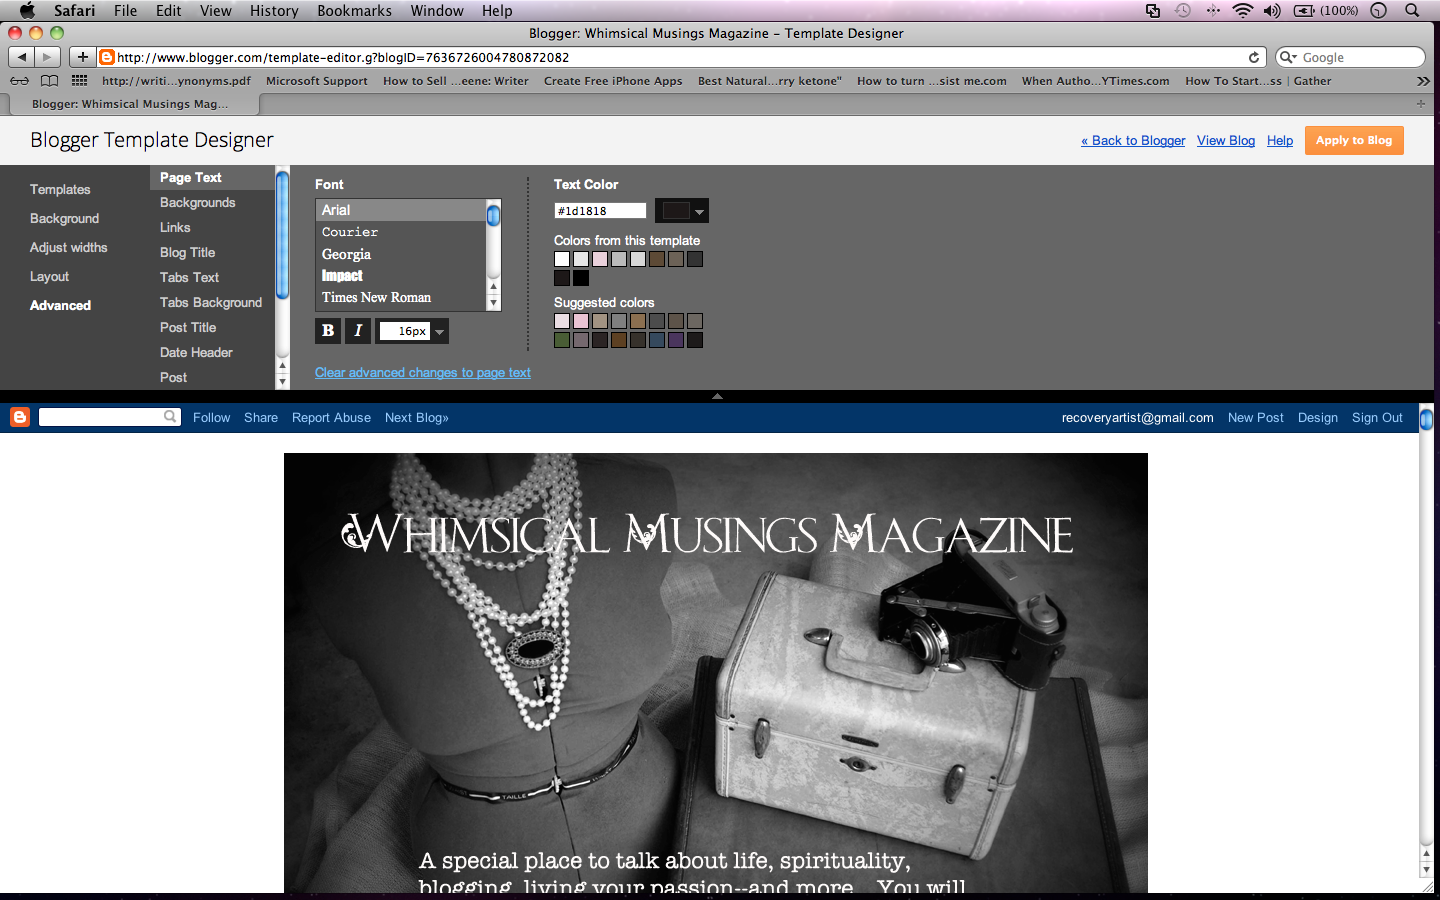
where it says DESIGN and click it.  (That's in the picture up above.)


I will arrive at the TEMPLATE page.  There I will look for the orange button that says DESIGN and click it! (The page will look like the one above.)


Next, a screen like the one above will appear.  It is the TEMPLATE DESIGNER page. I will push ADVANCED on the left sidebar..


Once I go to the new page as seen below, I will scroll down to where it says CSS FEED and push that.

Keep in mind that when you land on this last page (where all the magic happens!) you will not see ADD CSS .  That is why you need to move that blue bar down on the left side of your screen.  You will then see ADD CSS.


Almost done!


Click ADD CSS, You will see a screen. You will see a code. You will increase the number if
you want to move the header to the right. You will decrease the number if you want to move it to the left.


In this picture, you can see that it says 35 px. Just insert a different number to move it.

If I want to move it to the right, I put in 45.  If it's not enough, I just keep going up in increments of 10.
It's the same for if I want to move it to the left.  I start at 35...So, if it's not correct, I put in 25...I keep going down until I get the placement I want.

The larger the number, it moves right.  The lower the number, it moves left.

Get it where you want it and then at the top right, click APPLY TO BLOG.

That's it!!!

Special Note: Sometimes people go into their blog templates and there is no code there on that screen at all. If you want, you can copy and paste this code from my blog and then just change the numbers in it to move your header.


.header-outer {
margin-left:35px;
}


I am the author of 3 e-books on Amazon:


They were created to give
you the inspiration to make your blog rock!

Thanks for visiting--and I hope that this tutorial helped!

XO

Cindy

How to Check Your Stats on Blogger


Checking your stats is really important!  Start at your main page.  Scroll up to the top and click DESIGN.  

Next, you will see your Template Page.  On the left sidebar, you will see a list.  On it, look for
STATS.  Push it!


It will take you to a page that will look like the one above.  Every time I go to it, I can see:

How many visitors I have had
Where they came from
Which posts they read
Which words they used to search for my blog

When you do this on your own blog, make sure that
your own visits are not counted amongst the visitors.
There is a button to push where you can eliminate
yourself from being counted.

If you would like to feel inspired, I have written 3 books.
These are ebooks on Amazon and they are:


I hope that this tutorial was helpful! If it was, please click the +1 button below--thanks!

XO
Cindy

How to Make a Favicon and Insert it Into Blogger


First--what is a FAVICON? Look up at the top of this blog where the address bar is...See the fleur de lis? That is a favicon. It is a teeny tiny picture to put into your blog address to personalize it.


If you would like to create a favicon for your blog,
first go HERE. At this website, you will upload a
picture from your computer and it will automatically
create a small favicon for you. When you get the
picture, save it to your desktop.

Then, go to your blog. For purposes of this
demonstation, I am showing you my Whimsical Musings
blog.

As you look at your own blog, go to the top of the page
where it says "Design" and click it.


Here you will come to your Template. At the top
left, you will see it says "favicon."


At this point, click "Edit."


Now you will be asked to choose a file from your desktop.
You will choose the image you just made at the other
website. So, choose the file and click "save."

Now, exit your blog completely and once you are
at your browser, come back and visit your
blog again. Your favicon should appear up in
the search bar.

Note: Sometimes they are tricky and you may have
to insert them more than once--I know because I had
that happen, although I have no idea why! But, if it does
give you a problem, just try to upload it again.

I hope that this has been helpful. I am the author
of 3 Amazon e-books.

These are not technical in nature, but rather
are inspiration for creating your blogs.


Thanks so much for visiting! If this was helpful,
please let me know. I'd always appreciate it if
you could post this to Facebook--the button
is right underneath this post and says "F."

All the best,
Cindy

How to Add a Blog Button to Blogger


Many people want to know how to add a blog button to their blogs. I will show you how to insert on your blog.

But, first make sure that you save the button to your desktop so that you can work with it.

So, how is that done? 

Here is a screen shot of my personal blog. On your own Blogger blog, go to the top and push "Design" at the upper right. You will then come to your template page. 


Here is a picture of the Template Page.


On the left sidebar, you will see LAYOUT.  Click it.  It will take you to your layout page.  Click "Add a Gadget."


Once you do, a drop-down menu will appear.  Scroll down it until you see "Picture."


You will add your button as a "picture."  (If you notice, there is a picture of a tree in green.) Make sure that you know how the picture is labeled on your desktop so that you can find it.

When you push the word PICTURE, another drop-down menu will appear.  It is not pictured here.  It says CONFIGURE IMAGE at the top of it.  This is where you will choose a file from your desktop.  Look for the image that is your blog button picture.

There is also a space to give it a name.  If it is your own blog button that you are inserting, just call it My Blog Button.

Later, if you ever want to move your blog buttons around, this will make it handy for you.

When you add your OWN blog button, you do not need to insert an address...
Click "Save" and you're done!  All you need is the button and to label it with a name, "My Blog Button"--easy, peasy!

(When you get used to doing this, you can insert a blog button in a matter of seconds!)

If you are inserting someone else's button, you need to type their address in where it asks for their link.

If you are inserting my blog button, you will type in: cindyadkinswhimsicalmusings.blogspot.com
Once the picture is inserted and the link is typed in, click "Save."

If you don't, it will disappear!

Now go back to your blog to make sure that you see it on your sidebar.

If you have inserted a friend's button, make sure that you reach their address if you click on it.

If it did not work, just go back and make sure that you entered their address properly. If you
inserted the blog button on your sidebar, but it does not navigate to your friend's blog,
it is of NO use!

Important: If you want to insert a blinking button, simply go to your template exactly the same way. When the dropdown menu appears, do not look to insert a "picture." Instead, take the html code from the button that you want (you will see it underneath the blinking button on the person's blog) and then insert the code under "HTML." That's it!  In other words, you still go to "Add a Gadget," but you don't enter it as a picture.  The drop-down menu has an option of inserting an html code for it instead.

Was this helpful for you? Please let me know!!!

If you need more info. that is FUN, I hope you will read my new ebooks on Amazon. Blogging: It's a Woman Thing and Blog from the Heart: A Woman's Guide to Blogging. Yes, they are filled with inspiration for you to make your blogging rock!

If you need a blog button designed for your blog, as a graphic artist, I do design them and would be happy to. A blog button is necessary if you want people to post them with back-links for your blog. We ALL need more back-links! lol Just email me for the price at: Cindylou_20@hotmail.com They're not expensive!

Thanks for visiting!


Thursday, September 29, 2011

How to Blog--Blog from the Heart: A Woman's Guide to Blogging


Have you read my new ebook on Amazon? It's called

Most people tell me that the hardest thing about writing
a blog is coming up with fresh content. No worries! This
book will give you all kinds of tips and guidelines as
to what to write about to make your blog a "fun read"
for everyone who visits.

You can download the book in minutes and be on your way
to creating a FABULOUS blog that you truly care about
and that others will be eager to visit!!!

To see some examples, visit my main blog,
so much going on there--contests, giveaways, and
this week--A FREE Seminar About Blogging.

Why not grab a cup of tea and come take a look.
It will be fun and informative and give you a
chance to meet and visit with LOTS of fellow
bloggers!!!

XO
Cindy

Friday, September 23, 2011

Blogging: It's a "Woman" Thing


So many women want help with starting or improving their blogs. I have a new ebook that has just been published on Amazon called Blogging: It's a "Woman" Thing and I am so excited. Have you ever wondered how to get new visitors to your blog or how to keep up with writing new content? This book can give you valuable tips. But, more than that, it's my personal story.

I love being helpful. During the course of my blogging experience (which has been awesome) I have been asked so many questions and this book, as well as Blog from the Heart: A Woman's Guide to Blogging help to answer so many of those questions--and more.

XO
Cindy

Monday, September 5, 2011

Creative, Indeed!

Hi Everyone~

I would like to introduce you to Sherry
of Createology!! Sherry designs, sews,
runs her own Etsy shop, and creates
all kinds of paper crafts too!!


Hmmm....I wonder what she does in her spare time?
My guess is that every moment with this amazing
woman is all about getting her creative groove
on!


Of course, this ATC complete with Dorothy's red shoes
stole my heart~


And this Boho pouch was created by hand--a true
sign of Sherry's versatility!

Have a wonderfully creative week, everyone!!!

XO
Cindy