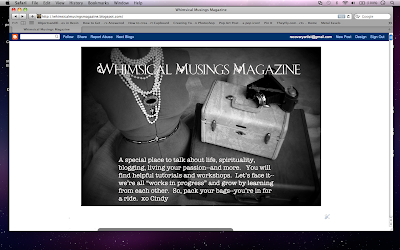
For purposes of this tutorial, I am using a pic of my blog. Just go to your blog. Up on the top right, click "Design."
You will be taken to your TEMPLATE page. (As pictured above.) On the left sidebar, it says LAYOUT. Click it.
Next, you will see the LAYOUT page. Near the top, you will see a gadget that has the name of your blog on it. Click "Edit."
A drop-down menu will appear where you can insert a picture. It will say CONFIGURE HEADER at the top of it. You can upload a picture from your desktop. However, if your blog header
has writing on it, simply click the circle that says "Instead of Title and Description." The reason is that you do not want to see the name of your blog appearing twice.
Click "apply to blog" and you're done. Easy, peasy!
XO
Cindy


Now maybe I can do it myself instead of asking Nicole;) Thank you for the tutorial, Cindy. Have a great week:)
ReplyDelete~Debra xxx
Capersofthevintagevixens.blogger.com
Oh- Thank you, Cindy- I had no idea how to do this. I have to run an errand but I think I will play with doing this tonight or tomorrow- xo Diana
ReplyDeleteHi Cindy,
ReplyDeleteThis is a great idea for new bloggers.
xo,
Dee
Dear Cindy,
ReplyDeleteYou are awesome!! I've been wondering about this forever and see how often you change yours and drool all over my keyboard - THANK YOU for making this look so easy!! Now - I'm building up my nerve and will try this out in the next few days!
Thanks Cindy, honestly, this will be very helpful to so many of us!!!
Blessings,
Donna
That looks really cool. Now did you add the title of you blog to the photo BEFORE you uplodaed it as the new blogger header? Your tutorials are really easy to understand. Love and hugs from the ocean shores of California, Heather :)
ReplyDelete